Deploying EPDM on Windows Azure

​

​Two weeks ago I did a show on my experiences of setting up a test server for EPDM on Microsoft's Platform as a  service (PaaS) and have been testing this setup over the last week.  I wanted to show a quick setup tutorial since this services has a 90 day trial where you can test drive it fully!

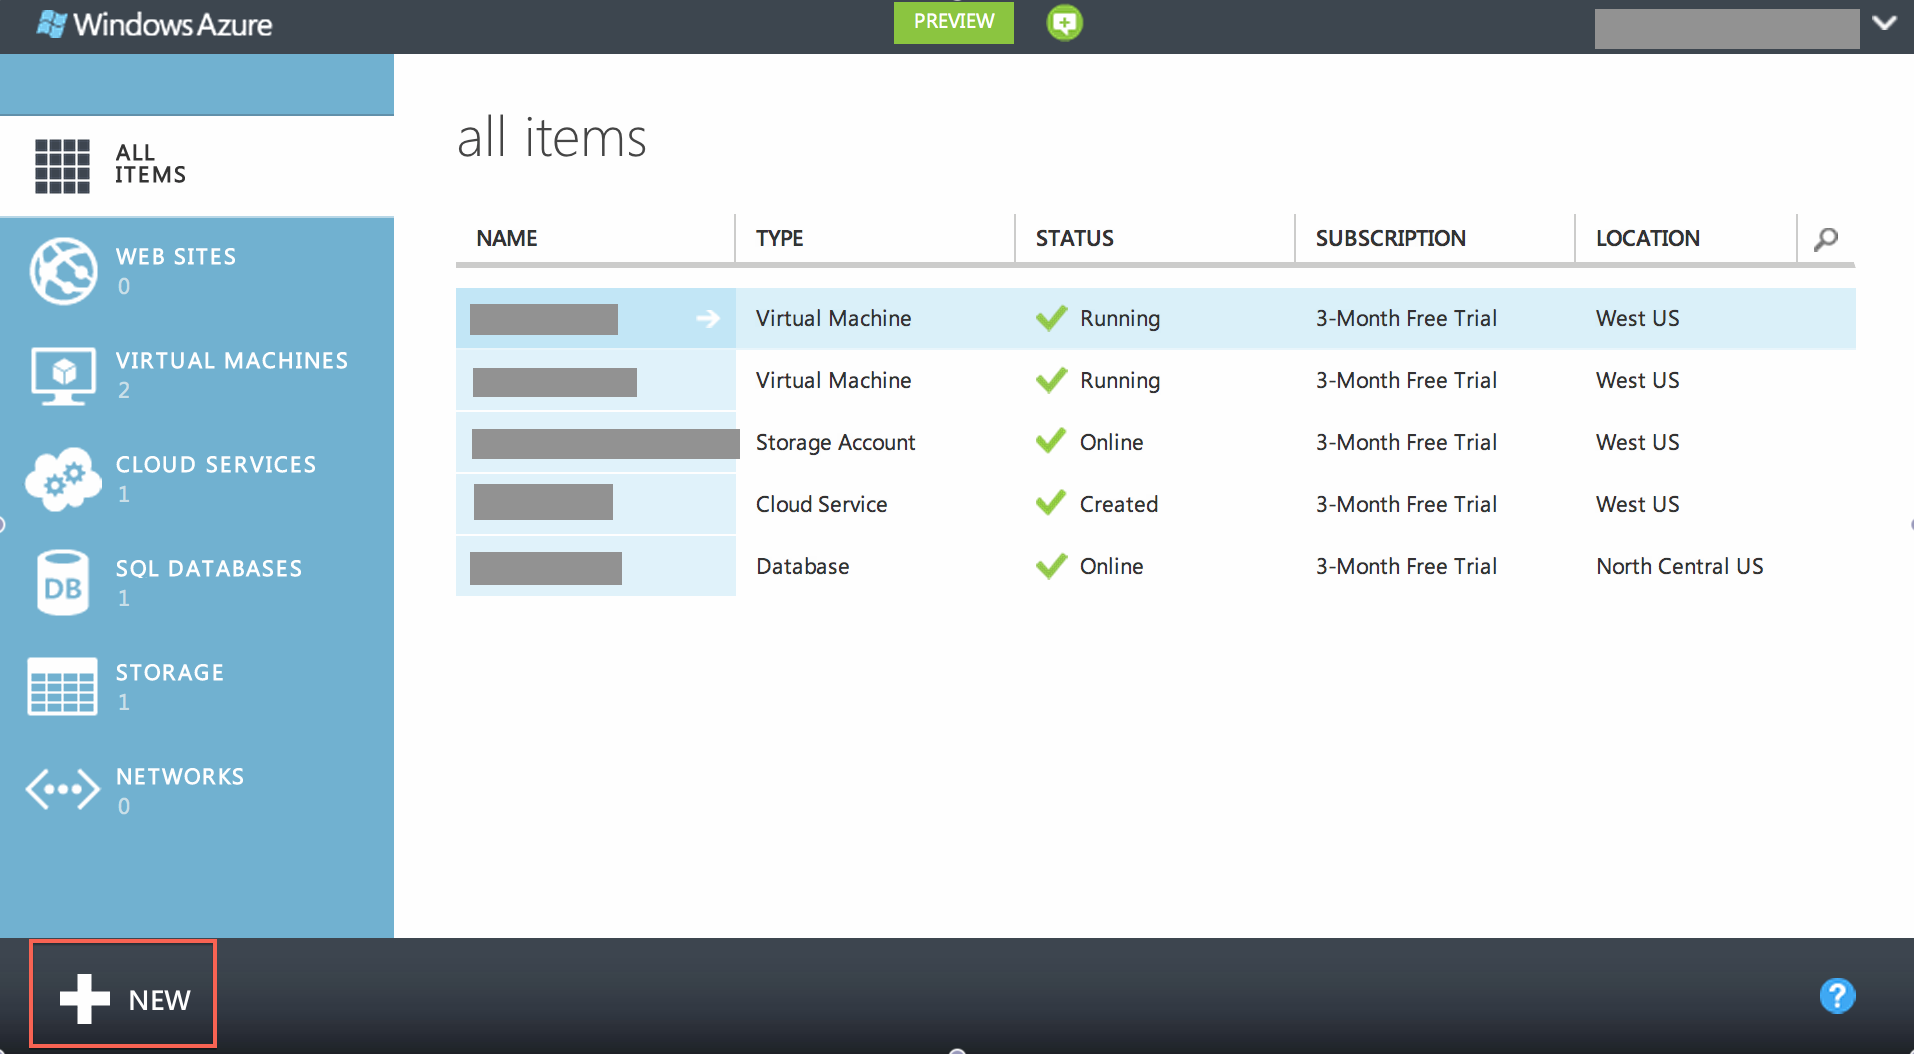
​Since many of you probably have a Microsoft account, especially if you are testing Windows 8 or more primitivlely have a Hotmail account login, you can sign up for the trial and then get access to the Portal for Windows Azure.  Here are the options that you get access to once you complete the trial signup process.

For EPDM purposes there were two services that I was interested in, Virtual Machines and SQL Databases.  At first my thought was to use a VM to host the server requirements for the archive and database services and a drive to house the archive hive (data store for file versions) and then host the database on the hosted SQL database service.  ​

Before I move forward, I tested if this SQL service would support all the same features as the on-premises version .  After further research, this was more of a service to power database applications and does not support stored procedures and other requirements needed for the vault creation wizard (SA access or db_owner access).  I did try a few other tricks like creating the database on a local machine and then importing it to the SQL store but no luck.  In SQL Management Studio 2012 there is a new database task to deploy to SQL Azure which failed when I tried with the Conisio Master and vault database:​

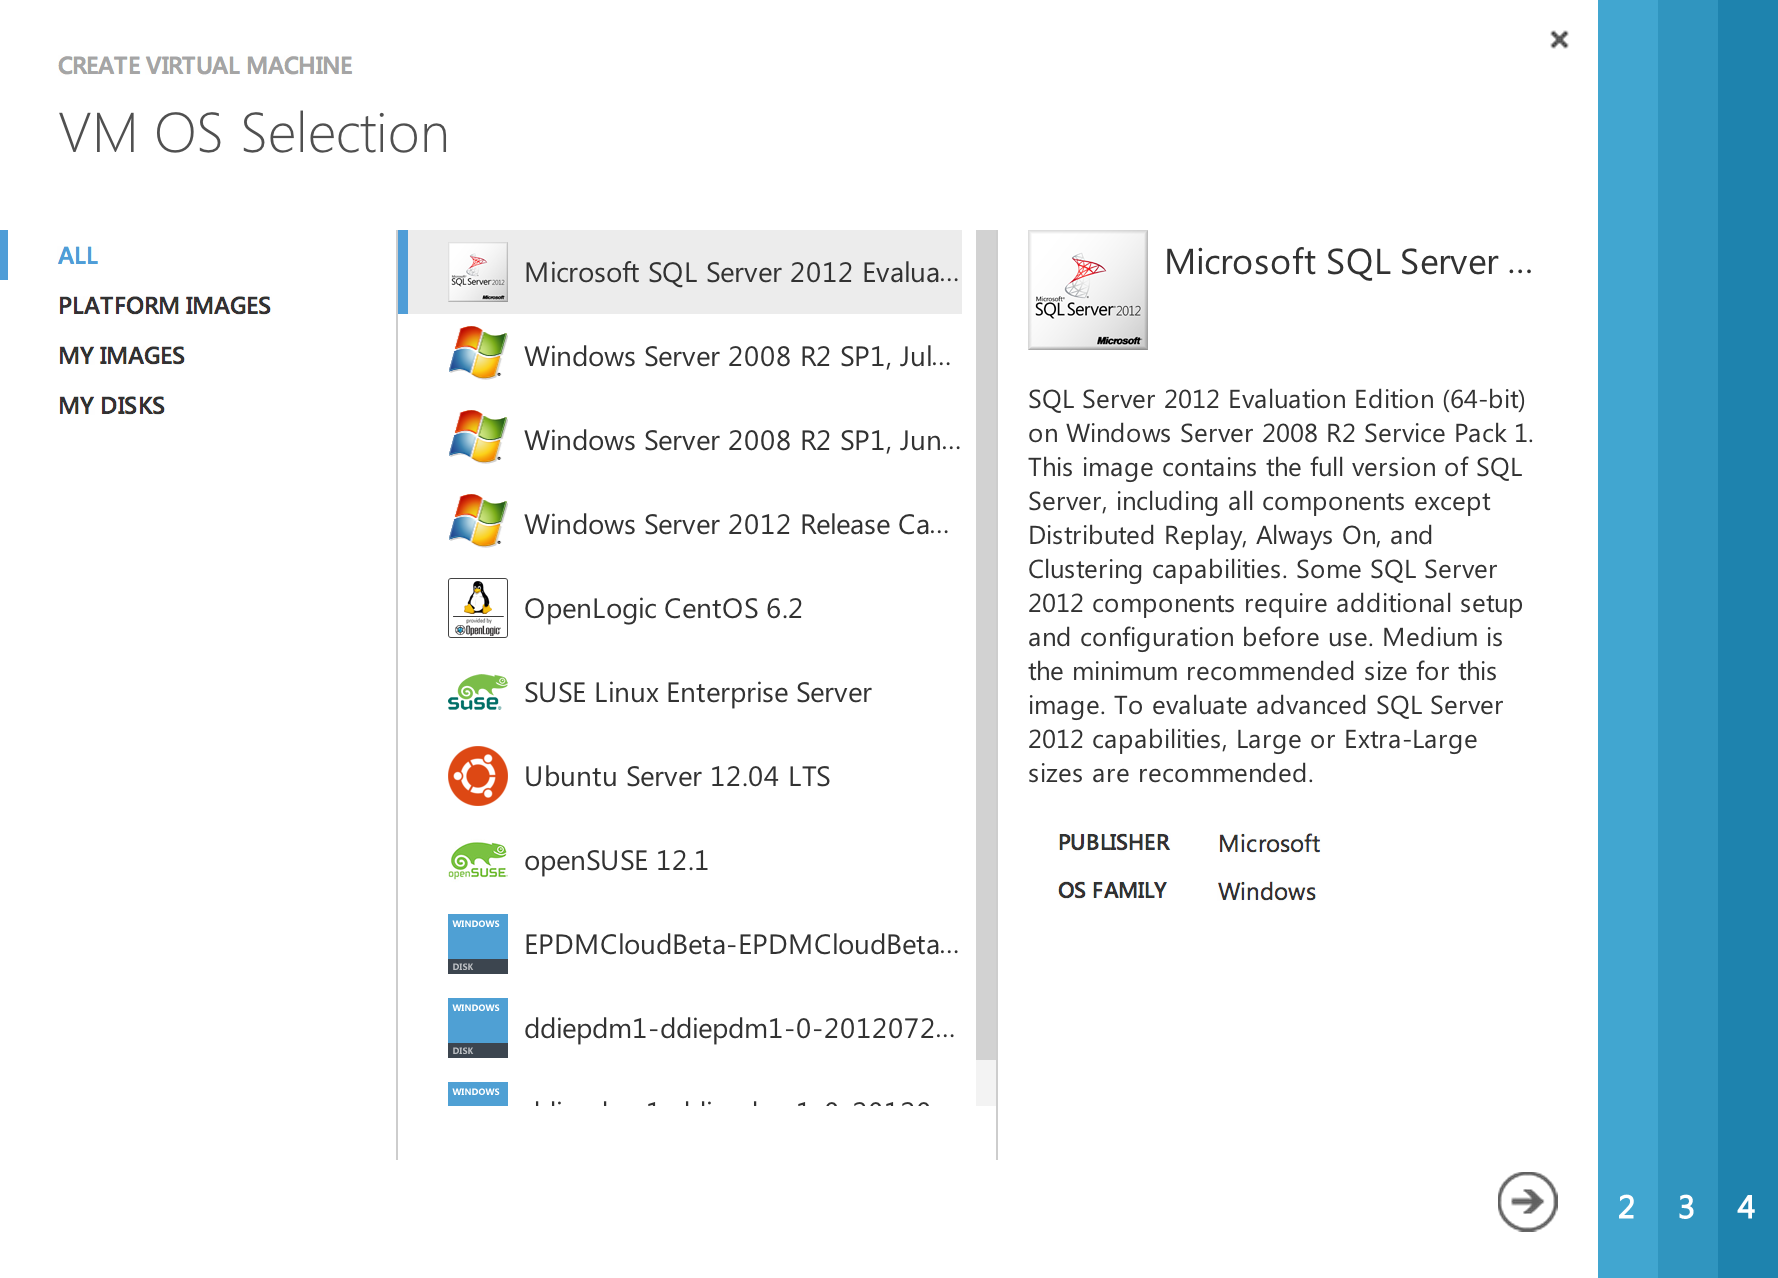
So despite wanting to use the hosted SQL platform, I had to resort to utilizing a local instance of SQL on a Windows Azure virtual machine.  The saving grace to using the Windows Azure VM is that you can literally deploy an instance in about 2 minutes with SQL already installed and setup.  The other benefit is downloading the 1GB EPDM install package also took only 3 min to download from the deployed VM!​

So here is the quick list to build your own testing vault for EPDM with a picture step by step:

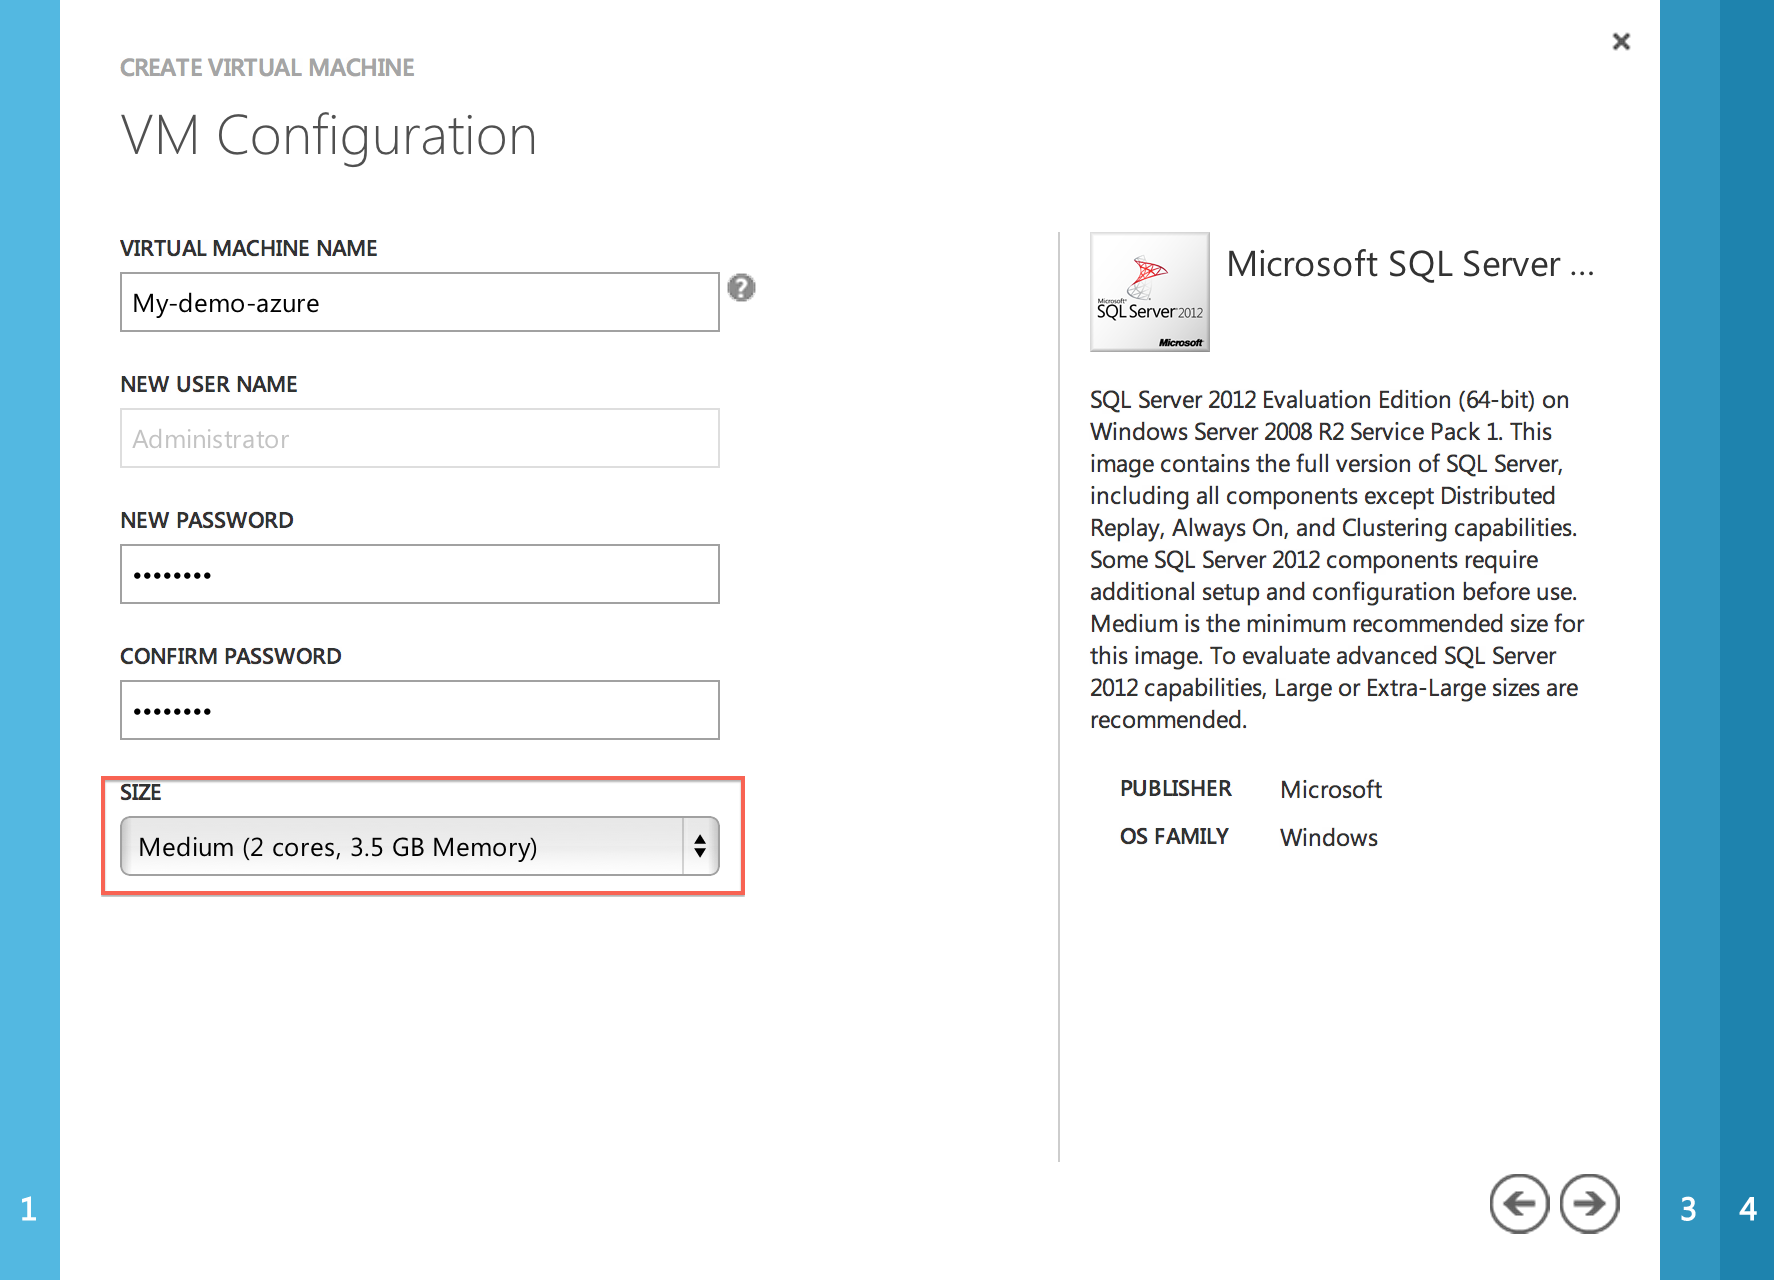
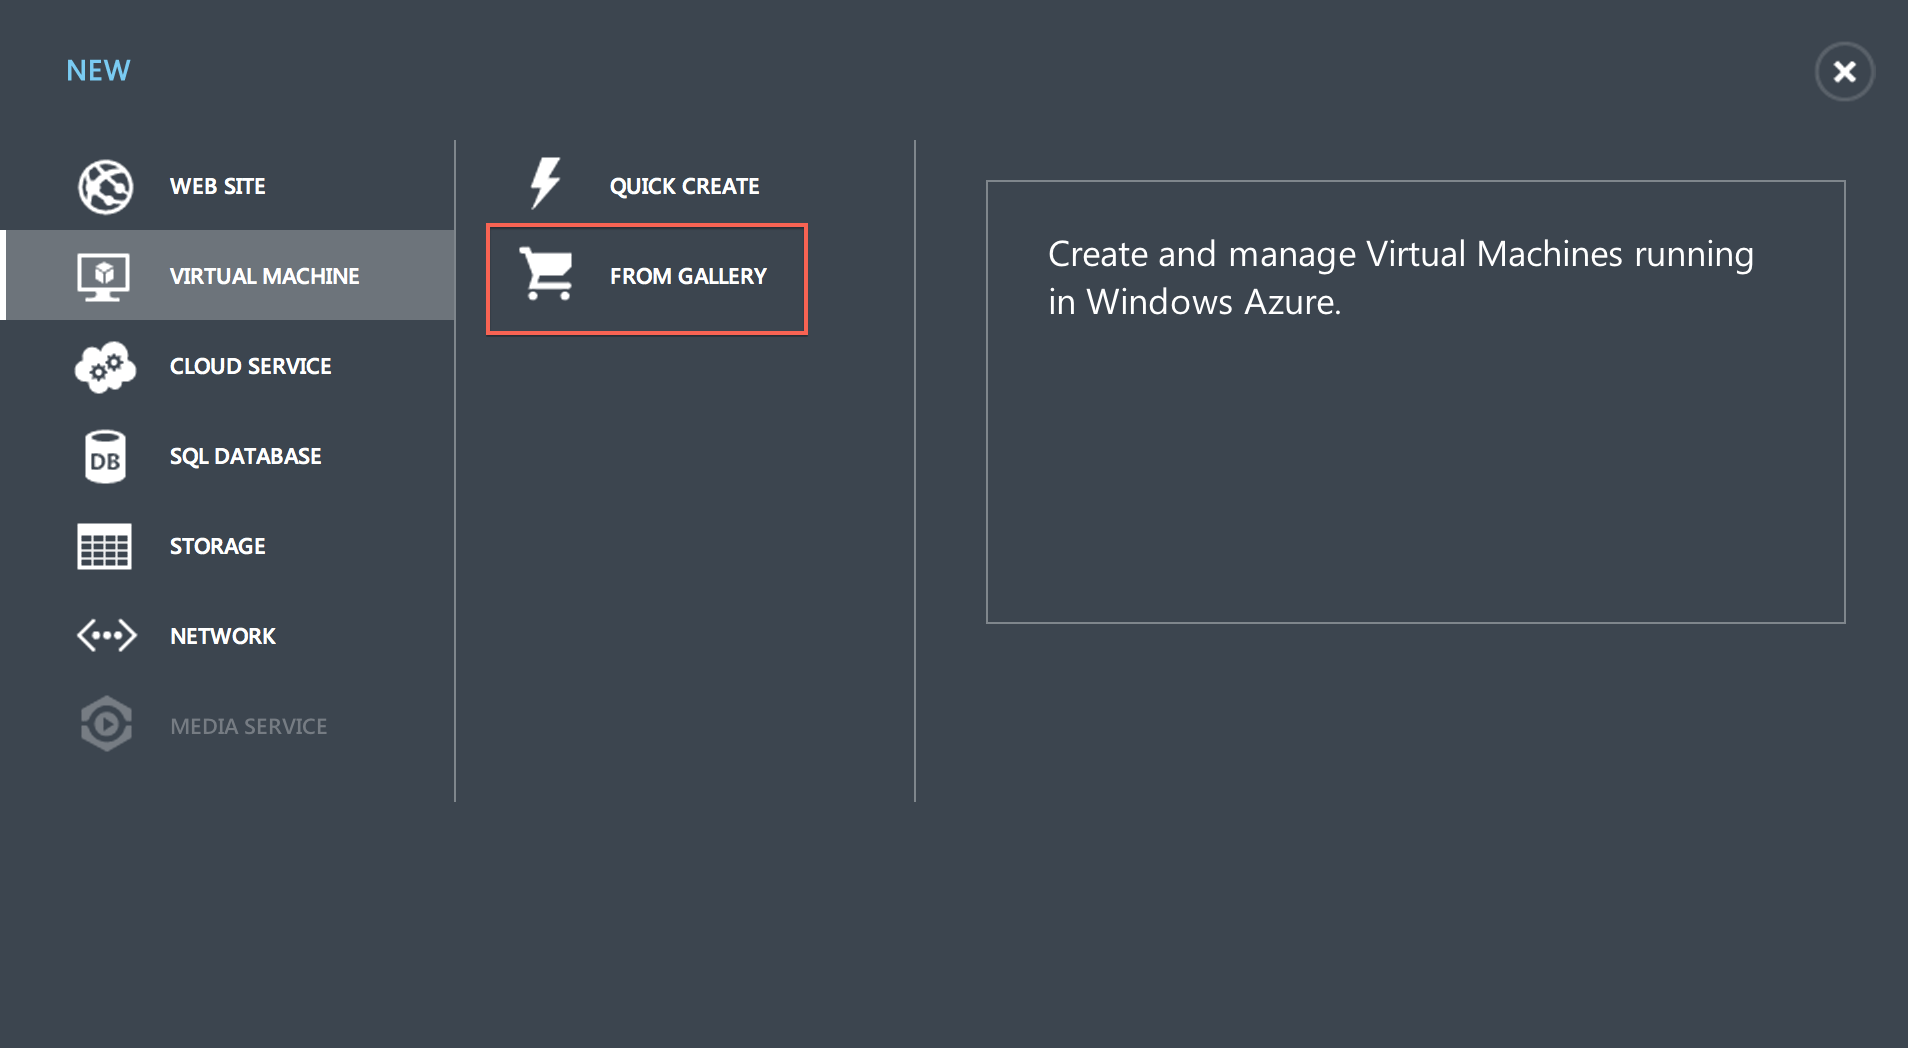
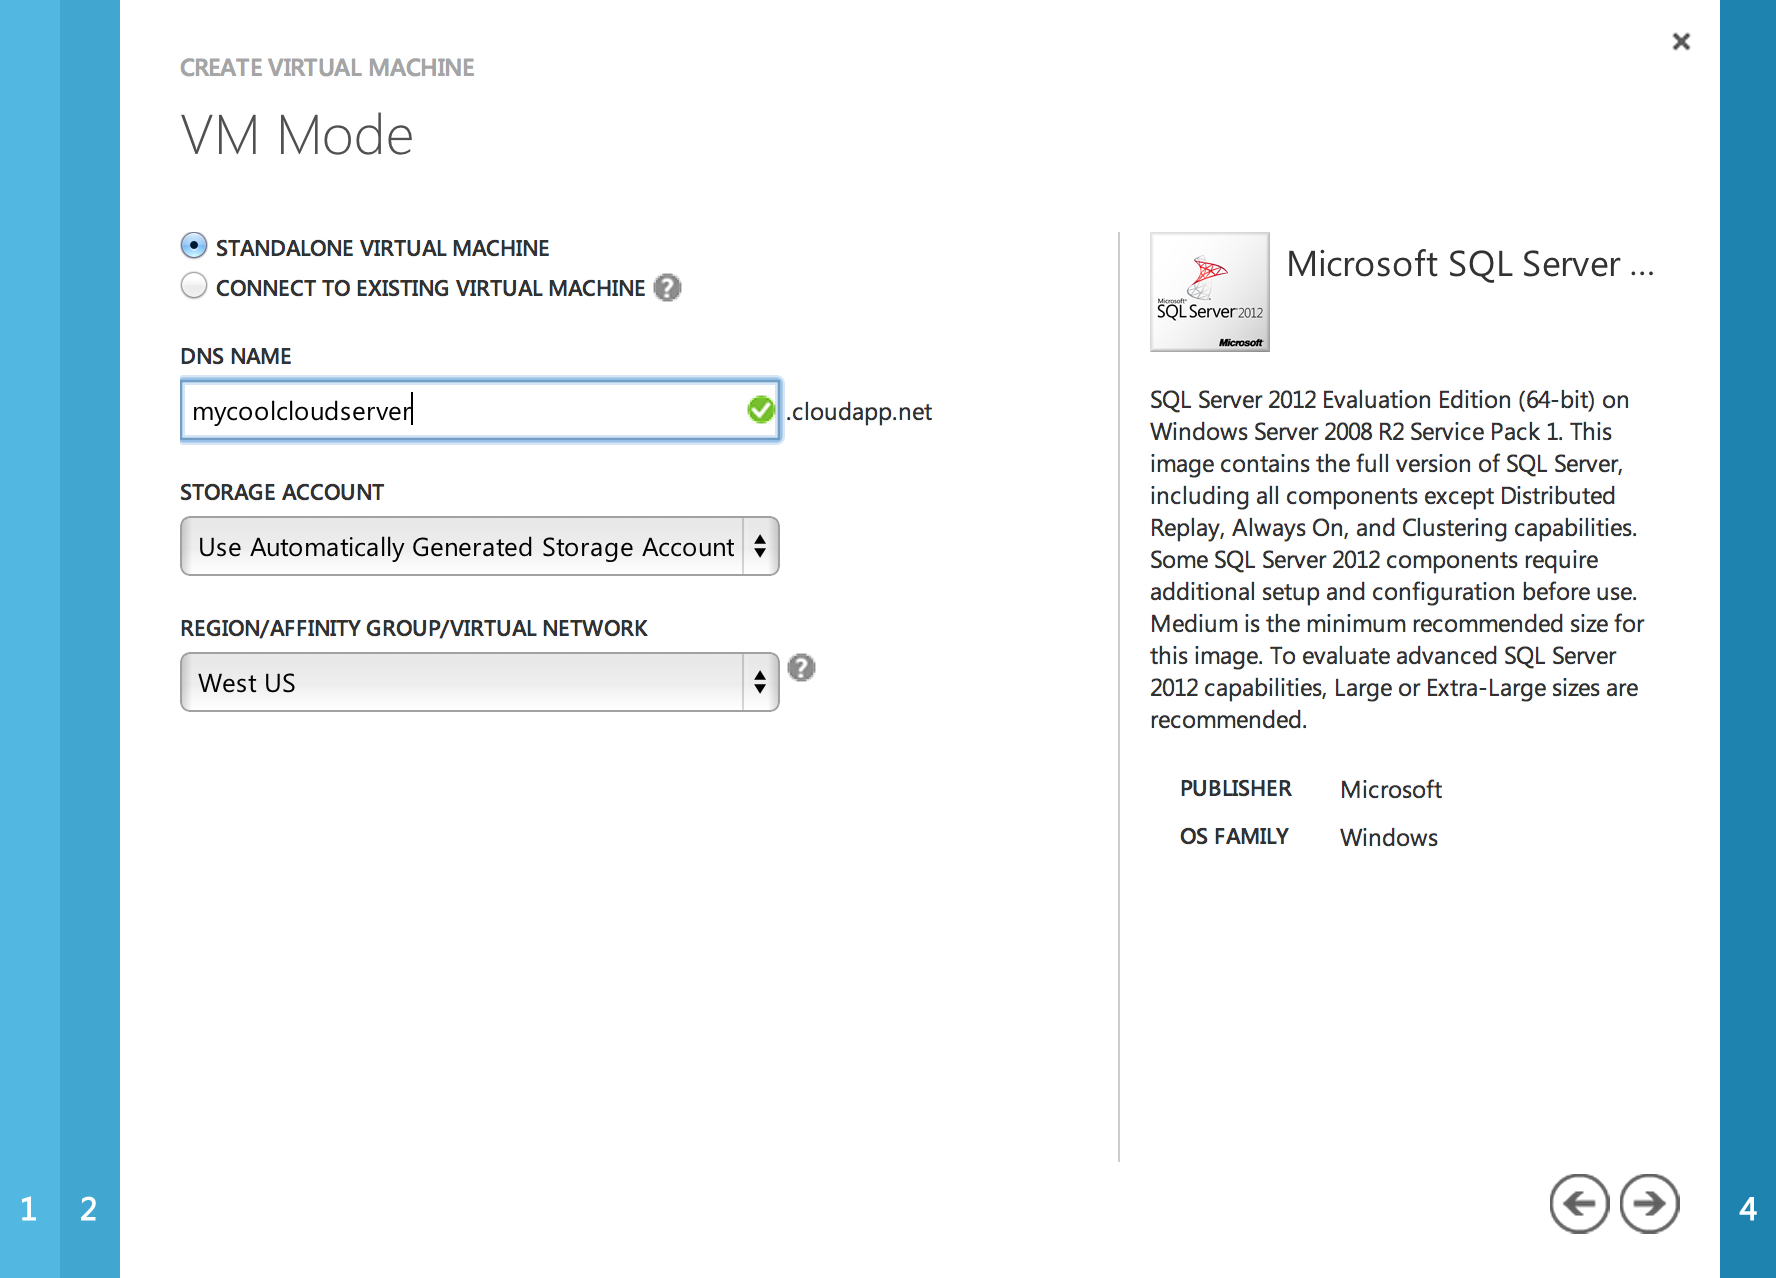
Once you follow the steps in the VM creation wizard, you will need to wait until the status of the VM show "Running".  You will then be able to click "Connect" which will create an RDP file with all the required connection info.  Now you have remote access to a brand new VM running Windows Server 2008 R2 with MS SQL 2012 installed.  There are a few changes to the setup that will need to be adjusted before use with EPDM is possible:​

  1. ​Switch the SQL instance to Mixed mode and set your SA password (I am assuming you know how to do this -> Properties of the server in MS SQL MGT Studio.)
  2. Add connection endpoints in Windows Azure to allow specific port communication with the new server (I used different ports for the archive server for the external port.​
  3. Possibly open up ports in the firewall on the server as well (3030 and 1433/1434)

​Now that the server is setup, the rest is done on the client machine.  On the client machine, add the public name of the server to the client machine's hosts file (C:\Windows\system32\drivers\etc) and point it to the public IP address shown on the VM dashboard on Windows Azure.  Now you can add the server and create a new vault hosted in the cloud.

Now I know I left out a few steps but there are a few things to also mention about this platform.  If this is going to be a production system, this setup does not address encryption, therefore all traffic is open and would recommend setting up a server to server VPN so that traffic is secure.  The other mention is that this does have to eventually be paid for so if you are curious on the cost of a hosted server, Microsoft has built a beautiful pricing tool that gives you live feedback of the monthly cost for your cloud setup.​

I run into a lot of companies that do not have an IT staff and/or resources to setup the infrastructure required to deploy EPDM.  Having a service that can provide a server at a reasonable cost, with nearly no maintenance and automatic backup off site can be a nice resource for the small business.  I like it for testing new software since I can deploy quickly and not impact my production environment. ~Lou

Vendor tracking with EPDM

A big part of engineering products is sourcing vendors, some of which may be tracked in another system possibility governed by the purchasing group.  This tends to be common practice in large corporations, however many smaller scale companies source thier vendors from within the engineering department and maintaining a list of vendors for BOM management can be a disconnected task.

In SolidWorks, many users will enter the part/assembly vendor information into file properties, which can make this easy to access downstream in drawings and bills of materials.  The issue is keeping a running list of vendors we use, tracking contact infomation and even sharing this list for easy selection in file properties.  When implementing EPDM, this question comes up frequently and knowing EPDM comes with MS SQL, a database, ideas start swarming around build a vendor database.  Although this is quite possible, there are ways to integrate this into EPDM without building new interfaces to talk to SQL or maintaining another system for vendors.

Here is how we can do it using the out-of-the-box functionality in EPDM and make this process simple to add, maintain and share your selected vendor list with the engineering group.

Step 1: Create a virtual document template:

Virtual documents can be a great way to use the SQL database to store metadata but not have to maintain a physical file.  You can right click, new -> Virtual Document in the vault view which will ask for a name and extension.  For this example I used "ven" as the extension which yeilds: FILENAME.ven.cvd.

Step 2: Build a file and template card:

Since we want to have an entry form as well as a display form, we will need to have two cards built in the EPDM system.  In my case I wanted to have a slightly different exterience for data entry than for display so I built the two cards to look a little different.  The file card will be associated to the "ven" extension so it only displays for my vendor cards.

 Step 3: Create "Add new vendor Template:

The last piece of the vendor creation will be to tie the first two steps together in order to add the right click menu and add our vendor files to one spot inside the vault.  In my case I have a folder called "Vendors" that I want all these cards to be created in.

Using Templates in EPDM, here is the setup to use the virutal document (*.ven.cvd) as the vender file created in the vault, using the vendor template card for entry and saving it to the "Vendor" folder in my "Standard Libraries" top level folder.

 Now that the template is created, the creation of a vendor named virutal document containing all the important information is stored in the "Vendors" folder.  If we pull up EPDM search, we can use the vendor file card to search for vendors to get details.

Step 4: Create a list from SQL:

Now EPDM contains a virutal roll-a-dex of vendor inside the "Vendors" folder, which is nice but the goal is to capture this list for selection in the part file card. Time for SQL to be our friend...  Create a new list in EPDM called "Vendors" using the data type "From SQL Database" using the following query: 

SELECT     VariableValue.ValueText
FROM        VariableValue INNER JOIN
                 Variable ON VariableValue.VariableID = Variable.VariableID
WHERE     (Variable.VariableName = N'Vendor - Name')

Notice the 'Vendor - Name' in the last line of the query.  This will be the name of the field you use for the vendor name.  Make sure to also set the refresh options to happen peoridically to a time interval that makes sense for the rate of new vendor entry.

Step 5: Add list selection to Part Card:

Edit any file cards that need to specify a vendor from this list, replacing the text field box with a Combobox and attach it to the vendor list created in step 4 under special value.  Now there is a single place where the vendor list grows and is now accessable from any file card in the vault using this new vendor list.  As vendors are added, the list grows and any file in the vault can access the new vendors.

This seems to be a easy solution to add and maintain vendors if indeed it needs to be done in engineering.  Granted this is not going to replace a sophiscited supply chain management system but is better than having the rogue Excel file floating around with hundreds of copies on the network.  ~Lou

Enterprise PDM Convert Tree Tweak

Exports out of Enterprise PDM are a common requirement to ensure outside parties are supplied with up-to-date drawings and models for manufacturing and design reviews.  To address this requirement, EPDM added Tasks a few releases ago, allowing a network on connected machines running SolidWorks to perform these tasks easily.   SolidWorks provides the "SWTaskAddin" which enables the common tasks of Converting and Printing documents out of SolidWorks.

There is one major difference between these two tasks besides the fact that one converts files into another format and the other prints them; selecting references.  Baked into the Print task is an option to "Auto-select" files within the reference tree including:

- None

- All drawings

- Parts and sub-assemblies only

- All parts, sub-assemblies, and drawing.

This feature is not part of the Convert task and is commonly requested for creating an export package.  Since this is a current limitation of the SWTaskAddin the only real option was to use the API and build a new task addin that displays that similar reference prompt.  I recently started building this addin and realized how much duplication would be needed just to get this one option so I decided to fiddle first!

Since the SWTaskAddin stores the task settings in the database, it is easy to trick the task to run the UI of one and execute the other.  Here is how you can get the convert task to prompt for references without coding an addin. Before I show the steps there are a few assumptions you have to first understand.

1. The tweaked task cannot have user interactions so you must "Set-it and Forget-it".

2. The reference prompt shows some print options that need to be ignored.

3. I am unsure how resilient this will be to upgrade and or patches (although it should be fine).

Convert Task with References Workaround:

1. Create a conversion task and set all the options like type, location, options etc. (Make sure all options are set to NOT allow users to change since that is part of the Convert UI).

2. Under "Output File Details", click on "Advanced Scripting Options..." and COPY all the highlighted text.

3. Click "OK" to save the task.

4. Reopen the task go back to "Output File Details", click again on "Advanced Scripting Options..." and switch the "Task user interface type:" from "Convert" to "Print".  You will get a prompt to close and reopen the task to let the settings to be loaded.

5. Reopen that task and now go to "Files", click on "Advanced Scripting Options..." removed the highlighted text and PASTE in the script you copied from the task when it was in "Convert" UI.

6. Click "OK" to save the task.

By starting the task as a Convert, all the settings of the convert task are saved into the database after we hit OK. When we go back into the task and switch it to a Print task, all the settings are still stored in the database from the Convert but we have now told the task to show the Print UI.  Replacing the Print task advanced scripting with that of the Convert task allows the print task to execute, using the settings in the database and displaying the reference screen we want from the Print task.

Although I enjoy coding add-ins for this tool, avoiding a lot of duplicate work and staying within the bounds of an out-of-the-box install is always the goal.  Despite the limitations of interaction and the print related interface options, the tweak gets the job done. Enjoy! ~Lou

Command Line Search in EPDM

One of the powerful parts of any PDM system is Search but it tends to not get as much limelight as other aspects of PDM like workflow or bills of materials. Search in SolidWorks Enterprise PDM brings a long list of powerful features from its Windows Explorer integration to the ability to build any search card to customize the experience of finding data.

EPDM's Search exe is located in the install directory (C:\Program Files\SolidWorks Enterprise PDM\Search.exe) which is the application behind the search buttons throughout the EPDM and Windows Explorer interface. This application can be further customized with a few switches for those that like the black screen (Command Prompt) or for those that just want a simple shortcut on the desktop to launch their favorite searches.

By launching the Search application as a shortcut, we can append switches to the run command to customize the application's default mode.  Here is a list of switches that can be added:
  • /V:<vault name> - Checks this vault for the search
  • /S:<search form> - Selects this search form to be selected
  • /F:<favoirte> - Selects this favoirte search to be selected
  • /HT - hides the tree on the left of the search screen (list of vaults and search cards)
  • /HP - hides the preview and other tabs from the screen (Preview, Version, BOM...)
  • /HF - hides the search form surrounding (looks like a unified window)
  • /P:<path> - search starting path starting point

Here is how you set it up:

  1. Create a shortcut on the the Desktop by a right-click drop/drop from the above install directory where the Search.exe is located. 
  2. Go into the newly created shortcut's properties (Right-click, Properties)
  3. In the Target you add the switches on the end of the path and outside of the "".  If you do something wrong, the message (shown on the right) will prompt you.
  4. Hit "Apply" and run the new shortcut.

TIPS:

  • You can use all the switches or any combination of them following your target path.
  • If any of the custom switches (/V: /S: /F: /P:) contain spaces, enclose those switches in "". (i.e. for a vault called "EPDM Vault" the switch would be "....Search.exe" "/V:EPDM Vault").

The result is a simple shortcut to lauch with user specific search screen with all the distraction hidden from view.  This is a great option when rolling out EPDM to a group that just needs to see certain files in the vault. Using Search with this clean UI will avoid teaching all the complexity of the vault structure and simply leverage the ability to get to the file of concern quickly! ~Lou

EPDM Dispatch Jumpin'

This past weekend I did a podcast on Enterprise PDM's scripting tool called Dispatch.  Dispatch is one of those essential utilities to further customize the way Enterprise PDM interacts with the database and it's users, however many don't know that the tool even exists!

Over the years I have used this tool to build simple automation tasks like renaming files or assigning serial numbers before a state change.   I also treat this tool as a buffer to programming via the API since programming, although very powerful, can be susceptible to upgrade issues down the road.

Recently I used Dispatch to assist users to evaluate files before submission for "Released" by checking if certain variables were filled out in the data cards.   This can be done by requiring EPDM to make this a "required" field, however that can lead to frustration to users when EPDM is used in development and versioning is desired before these details are defined.   The other solution is utilizing conditions on the transitions in EPDM, allowing a check of certain criteria to be evaluated prior to allowing files to move to the next state.  Conditions work well to prevent transition but when a transition is denied, users are given a generic warning that "Conditions have not been met".  This gives no indication which file(s) or what condition(s) are missing.

I could have written a program that would monitor the file and throw up a warning and prompt for a variable to be entered but before I fire up Visual Studio, I fist see if I can try to remedy the limitation with Dispatch.

Dispatch as a Check Tool:

In this situation, the customer wanted to restrict transitions with missing variables "Description" and "Number" with a transitional condition (mentioned above) but give the user an ability to first check which files fail and then have the opportunity to enter that data easily without having to check out every file, add the missing variable values, and check back in.

So I fired up Dispatch and built the following check script utilizing the jump feature:

 NOTE: Sometimes reading through this can be a bit confusing but here is a summary what is performed by the script:

  1. Check if the variable "Number" is blank and check if "Description" is blankDispatch Variable Assigned.
  2. If only "Number" is blank then it shows a message with the file name that "Number" is missing.
  3. If only "Description is blank then it shows a message with the file name that "Description is missing.
  4. If both are missing, then a mesasage with the file name show that both "Number" and "Description" are missing.
  5. If both "Number" and "Description" are not blank, it does nothing.

The second part of the request was to then give a simple pop up to ask for the missing info.  This was done in a similar way but I then popped up an Edit box prompting for the information needed.  I could have combined the two but in this case, the request was for these to be separate right-click options for the user.

Dispatch is a powerful little tool to automate certain aspects of EPDM and can be used by almost anyone without any programming knowledge at all.  If you have ever built equations in Excel, you can do Dispatch!  I have attached the two files for reference if you are interested in trying it out.  ~Lou

SQL CHECKDB Saved My EPDM Vault

Since 2001 I have been using SolidWorks Enterprise PDM, previously known as Conisio, and I have had a vault that I have kept upgrading since version 5.3.  Since the move to version 6, the upgrade process for EPDM has been quite simple.  I would go as far as saying it might be the simplest product to keep up to date in the entire product line.

Typically the update involves running the installer which is not a "patch" but a complete standalone installation of the new version.  The installer detects what is installed and allows you to hit "Upgrade", essentially seek and remove/install the new version.  This is done on the clients as well as the server(s) and the last step is to run the Update tool (located in the Update folder of the install source) which updates the SQL database with the necessary changes for the new version. 

In all the updates I had done, never have I ran into an issue performing an upgrade of the software or the database.  This past week I was upgrading my vault, mentioned above, and the patch to EPDM 2011 SP2 went as expected but upon running the Update tool, I ran into the following error: 

If you are ever faced with this issue, there are a number of solutions in the SolidWorks Knowlege Base to assist you in finding a place to start.  If you check the logs in the Administration tool you might be able to find out what the issue is and correct it.  Typically while the Upgrade tool is running, a progress bar displays at the bottom and when an error is discovered, a message will appear informing you an error has occurred and to look at the next screen for details.  In my case, there was no error reported.  The KB had solutions and SPR against similar issues, however none of them had exactly the issue I was experiencing.

The archive server log showed an issue accessing the item in the database, which did have some specific SPR and Solutions associated with it but the details were not the same.  Looking in the SQL logs there was a corruption in the database itself and showed the last query ran along with the error it generated.  Running the same query did indeed error out as indicated in the logs.  Due to the age of this vault, it didn't surprise me if there was some debris in the tables that might be causing some issues with the automated script tools that are required to run.

Since I backed up, as you all SHOULD be doing prior to updates, I decided to try a few tricks to see if rebuilding the database would fix the update issues. 

In order to perform a rebuild, the vault database must be placed in a "Single User Mode" and then told what level of rebuild you would like to perform.  I ran the following:

/*Select database "Demodata"*/
Use Demodata
GO
/*Switch to Single User Mode to perform Repair/Rebuild*/
ALTER DATABASE Demodata SET SINGLE_USER
Go
/*Run Database Check in Repair/Rebuild mode*/
DBCC CHECKDB('Demodata', REPAIR_REBUILD)
GO
/*Switch back to Multi-user Mode for use again*/
ALTER DATABASE Demodata SET MULTI_USER

There are different levels of the CHECKDB command, some of which can be much more destructive and can corrupt or destroy the database so MAKE A BACKUP...consider yourself warned!  For more information about the rebuild command you can check out MSDN for more information.

Once I performed the rebuild, I re-ran the Update.exe tool for Enterprise and the update took without errors.  This is the first time I have had a database not update without error but if you upgrade enough vaults, you are bound to run into an error or two! ~Lou

Enterprise PDM Upgrade, Lost 'sa' Password.

In a typical installation of Enterprise PDM, sysadmins or responsible users are also installing a new instance of Microsoft's SQL Server.  During the initial install there is a step in the process that requires an 'sa' password to be set when running in mixed mode.  This is the "System Administrator" account and due to it's importance to the security of the SQL server, there are some prequisites to setting this password which tend to make it longer than most sysadmin's "usual" password and hard to remember.

Problem:

Once the 'sa' password is set, and entered into the setup screens of EPDM, it is remembered by EPDM and continues to use it for communication.  Since this password is somewhat unique to this installation, companies then to "misplace" this password and panic when they have to enter it for an EPDM upgrade.  This typically involves a phone call to me frantically asking if I happened to write it down, at which point I say NO!

Solutions: A few...

GUI Option: Since MSSQL is setup in "Mixed Mode" you can also log into SQL Server Management Studio with the local Windows administrator account or an account with membership to the BuiltIn/Administrators group. Once authenticated via Windows an admin can go into the Object Explorer under Security->Logins->sa properties and reset the 'sa' password and resume the upgrade process.

SQL Script Option: If you rather use an sql script in Management Studio, click on "New Query" and type the folling script and execute:

GO
ALTER LOGIN [sa] WITH DEFAULT_DATABASE=[master]
GO
USE [master]
Go
ALTER LOGIN [sa] WITH PASSWORD=N'yournewpassword
GO 

Command Line Option: As long as you can login with this Windows administrator account, why not fire up the command prompt and run a quick script. Just go START->RUN->CMD and type (hitting ENTER after each line):

OSQL -S yourservername -E
1>EXEC sp_password NULL,'yournewpassword','sa' 
2>GO 

You can type 'exit' at the '1>' prompt to exit to the command prompt and 'exit' once again to exit the command prompt.

Gotchas...

MS SQL does give you two ways in when you use Mixed Mode authentication, however if you forget your sa password and mess with the domain or local accounts of that system, recovering this data is much harder to do and requires last resort registry hacking and/or 3rd party tools to recover this data.  So remember your 'sa' password and know where to get it when upgrading EPDM or other tools that require 'sa' authentication. ~Lou

Enterprise PDM Notification via GMail

One of the best features of SolidWorks Enterprise PDM is how notification within the EPDM ecosystem works out-of-the-box with zero config.  Obviously actions would need to be added in order to trigger the notifications, however setup and intgration with internal email servers is not required for this to function.

Although this is convenient, some would suggest having a separate inbox for EPDM notifications outside of Outlook can introduce "procedure fragmentation" AKA (confusion for the masses).  EPDM is easily configured to use an external SMTP (outgoing) server with, let's say, Exchange without much hassel.  The challenge comes in when integrating with services secured via SSL, like GMail.  SSL (Secured Sockets Layer) encrypts communication, adding a layer of security that many email/notification systems do not have baked into their configuration.

In our move to Google Apps, our CRM tool needed to now communicate with an external GMail account for sending and receiving email, however it lacked the ability to authenticate with Google's SSL servers. This limitation is also present in SolidWorks Enterprise PDM's SMTP Settings.

Stunnel to the Rescue!

There is a great free and open source application called Stunnel that offers an elegant solution to solve this SSL bridge requirement.

Stunnel Setup:

- Download stunnel and install it on the server running EPDM Archive service.

- Edit the "stunnel.conf" file (Start->Programs->Stunnel->Edit Stunnel Conf)

- Ensure the following is included or uncommented in the stunnel.conf

cert = stunnel.pem
socket = l:TCP_NODELAY=1
socket = r:TCP_NODELAY=1

client = yes

[ssmtp]
accept = 25
connect = smtp.gmail.com:465

- Save the stunnel.conf file 

- Install the stunnel service (Start->Programs->Stunnel->Service Install)

- Start the stunnel service (Start->Programs->Stunnel->Service Start)

Enterprise PDM Setup:

- Log into the Administration Tool

- Edit Message System and select "SMTP" from the Selected mail system pulldown.

- On the SMTP Settings tab, fill in your EPDM server address and port 25 (where you installed the stunnel service) along with the GMail user (username@gmail.com or Google Apps address) and password.

- Enter in the desired From Address and From Name to display in the email.

- Use Test Settings to send an email out to get a returned result!

This solution has been rock solid and can give many email tethered applications the ability to work with more sophisicated protocols like SSL and secure your communication in the end.  If you have other unique ways to achieve the same result, please leave a comment and share your solutions. ~Lou

Google Integration with SolidWorks EPDM

This past summer a Google project was released on Google Code called GoogleCL (AKA Google command line), bringing access to some of Google's services to the command line. You may ask yourself, "Why would I want to use a command line interface when I have a WYSIWYG web UI in my browser?". Well we humans like nice UIs but automation systems lend themselves nicely to command line interfaces since options and other settings can be built up with scripts.  GoogleCL essentially brings a handful of Google's services to be used easily with any command line script.

Enter PDM

SolidWorks Enterprise PDM has many front-facing features to document management, however EPDM also provides a number of  "behind the scenes" options to automate actions internally and externally to the EPDM ecosystem.  Various automation can be delivered with programming (Addins), a script building GUI (Dispatch), as well as the out-of-the-box workflow transition actions.

Since I live in Google services professionally (Google Apps) and personally (GMail/Docs/Calendar), anything I can do to integrate these tools into SolidWorks peaks my interest. Google CL (Command Line) currently offers access to the following services:

  • Blogger
  • Calendar
  • Docs
  • Picassa
  • YouTube

For integration purposes I choose Google's Calendar and Docs services since they tend to be common places for design teams to create and sync their design efforts within Google's habitat. How to do it? On Windows it is actually pretty easy since it is all contained in the zip and nothing needs to be built.

 Setup

  1. Download GoogleCL (make sure to select either the 32 or 64 bit build)
  2. Unzip the download to a folder and run Google.exe
  3. Run a simple test for both Calendar and Docs to generate your user Auth Token. (These are stored in your user directory under a folder called ".googlecl".
  4.  

    Calendar: calendar add "Test Appointment Today"

    Docs: docs upload c:\test.txt

    Note: Both of the above scripts are run in the google prompt and will launch a web page allowing you to login in and grant access to Google CL.

  5. In the Enterprise PDM Administration tool, log into the vault, edit the workflow and display the properties of the transition where the new Google action will be added.
  6. Add a new Action using the type "Execute Command"
  7. Enter command to execute:
  8. For a Calendar event: C:\URL_to_googlecl_folder\google.exe calendar add "Review of [Filename] Tomorrow"

    For a Doc Upload: C:\URL_to_googlecl_folder\google.exe docs upload [FilePath] --folder "folder_in_Google_Docs" --no-convert

    Note: Both scripts can use the ">" button to add specifics about the file being transitioned such as the filename or file full path. 

There are still a few things to keep in mind when using Google CL when using it with EPDM.

  • Every client must have Google CL installed in the same location so the EPDM action can launch the script.
  • All clients will need to authenticate with their Google Accounts in order to create the Auth Tokens before using their accounts with EPDM.
  • The ability to upload any file, a recent addition to Google Docs, with the script option "--no-convert" only works with Premier Google Accounts, otherwise the upload will automatically be converted.
  • It doesn't seem to be straight forward to use it with Google Apps for Domains but I am continuing to figure out an easy way to do this and will post an update when I get it figured out.

Conclusions?

With Google becoming a more common backbone among some companies, GoogleCL is a good start to bring some automation and easy integration to engineering tools like SolidWorks Enterprise PDM. For those that want to get deeper, Google's services do have a full API and can be written to but these script tools make it simple to get the ball rolling.

If you have tried GoogleCL and have interesting way of utilizing these tools, please leave a comment.  I am interested in other use cases to try out as well!~Lou

Setup a Demo Environment for Enterprise PDM

I was beta testing Windows Vista in mid 2006 when SolidWorks shipped SolidWorks 2007 which had Vista support in Pre-release 2 but was pulled when SP0 shipped. Beta testing for SolidWorks 2008 came in July and both SolidWorks and Enterprise PDM had full Vista support, however at the time all the server components (Archive, Database and SQL) of EPDM were not yet supported to run in Windows Vista.  Since I demonstrate this product and cannot come to terms with running an operating system that is not current, I needed to find a way to make this possible.

Without getting into all the solutions to achieve this, the obvious choice was to setup a virtual machine of my "server" and install all the EPDM components there and simply use the client in Windows Vista.  I downloaded both Microsoft's free Virtual PC and VMWare's Server Edition and setup a Windows 2003 Server and was able to connect to it without any issue.  The default setup for the network adapter was to just share the network from the host, using DHCP to acquire an address.  This was fine when I was connected but ran into some issues when I was onsite and my system was offline.  I could have set my adapter to use a static address but this was a pain since I would need to switch it back when I wanted to get online.  Therefore, I needed another solution...

Demo Environment:

IP setup on virtual machine

1 - On the host machine, go to the Device Manager and right click on the system at the top of the navigation tree (typically the name of your system) and select "Add legacy hardware" and hit Next. Pick the option "Install the hardware that I manually select from a list (Advanced)" and hit Next.
Under "Common hardware types:" select Network adapters, hit next andAdding loopback adapter on Host select "Microsoft" under Manufacturer and "Microsoft Loopback Adapter" under Network Adapter.  Follow the prompts to install the driver.
Now the Loopback Adapter should be displayed in the list of network adapters under Network Connections.
2 - Assign a static address to the newly installed Loopback adapter by going into "Properties" under IPV4 settings and add an IP, Subnet mask and gateway using an internal addresses like 192.168.x.x or 10.x.x.x.  I set the host ip to x.x.x.2 and it's gateway to x.x.x.1.
IP setup on Host machine3 - Once you have your Virtual Machine setup, go into the network adapter (in the VM) and set a static ip and a gateway similar to the host but use a differnt ip and same gateway.  I set the VM ip to x.x.x.3 and it's gateway to match that of the host (x.x.x.1).
4 - The last step is to set the virtual machine's settings to use the Host's loopback adapter as the network connection.
This configuration is one I have used for the past 5 years and is a great wayVirtual machine environment network settings. to estabilsh a closed network between my host and server, keeping all the server components off my workstation. Althouth today these components will run on Vista or Windows 7 without issue, I still opt to use this setup to keep the server components off my workstation.  It also makes it very easy to make a copy of the server and use it for testing of beta builds without messing with the installation.  Moving to another system is easy as well since relocating the vm file to another system, installing your VM software and restarting is all it takes.
There are a number of paid and free solutions on the market to virtualize an operating system.  Sun VirtualBox works well and Microsoft's VirtualPC is nicely integrated with Windows 7 but in the end, for me, VMWare Server seems to have the most customization and advancements in utilizing what the host machine has to offer. ~Lou